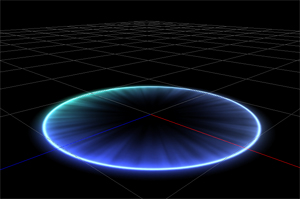
4. Add Circles and Particles that Float Up from the Ground
Lets add an element to circles that float up from the ground.
This is for the part for expanding circles.
Under Schematic from the Effect Emitter, click on the “Quad Emitter” button.
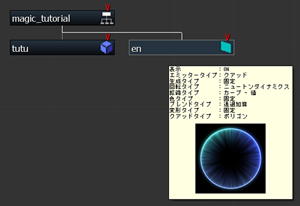
Under the “Texture” tab
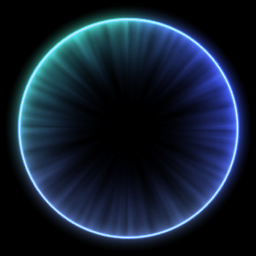
select the circle material.
Under the “Details” tab
set “Quad Type” to “Polygon”.
Under the “Rotate” tab
set “Rotate Type” to “Newton Dynamics” and input the following settings.
Initial Value:(x、y、z):(90、0、0)
Random Value(x、y、z):(0.0、360.0、0.0)
This sets “en” to display horizontally.
Under the “Basic Settings” tab input the following settings.
Name:en
Life:30
Under the “Generate” tab input the following settings.
Emit Count:6
Emit Time:20
Under the “Scale” tab
set “Scale Type” to “Curve Value.
The circle will get gradually bigger up until the size of the cylinder.
Under the “Blend” tab
set “Blend Type” to “Semitrans Add” and
“Alpha Type” to “Curve”.
With Timeline, adjust key frames so that the circles seem to gradually appear and disappear.
——
Copy “en” and create “en1”.
This will be the material for the part of the circle that gradually disappears for the expanded circle.
Under the “Basic Settings” tab input the following settings.
Name:en1
Active Start:30
Life:90
Under the “Generate” tab input the following settings.
Emit Count:2
Emit Time:1
Under the “Scale” tab
set “Scale Type” to “Newton Dynamics” and input the following values.
Initial Value:(x、y、z):(12.0、12.0、12.0)
Under the “Rotate” tab
set “Rotate Type” to “Newton Dynamics” and input the following values.
Initial Value:(x、y、z):(90、0、0)
Random Range(x、y、z):(0.0、360.0、0.0)
Speed Random Range(x、y、z):(0.0、3.0、0.0)
Under the “Details” tab
set “Quad Type” to “Polygon”
(”en1″ is a copy of “en” so setttings are completed)
With these settings, time and again the circle expands and smoothly disappears.

The rotation speed is random.
——
Next, lets add a particle element that floats above the ground.
Under Schematic from Effect Emitter click on the “Quad Emitter” button.
Under the “Texture” tab
select the particle material.
Under the “Basic Settings” tab input the following settings.
Name:tub
Active Start:30
Life:60
Life Random Range:20
Under the “Scale” tab
set “Scale Type” to “Newton Dynamics” and input the following values.
Random Value(x、y、z):(0.3、0.0、0.0)
Under the “Generate” tab input the following values.
Emit Count:20
Emit Time:10
Under the “Move” tab from the “Type” select “Curve-Speed” and input the following values.
Random Value(x、y、z):(8.0、3.0、8.0)
This setting makes the Timeline speed start out fast with speed gradually lost.
Under the “Blend” tab
set “Blend Type” to “Semitrans Add” and
“Alpha Type” to “Curve”.
From Timeline, adjust key frames to make particles seem to gradually disappear.
In this way, adding a variety of materials gives each its own flavor.
